Table of Contents
Mounting and connecting the camera
Mount and install the camera in the correct way. For details, please refer to “AN01-How to install Vzense 3D Time of Flight (ToF) camera correctly“.
Camera wiring diagram
The meaning of each power cord is shown in the figure below:
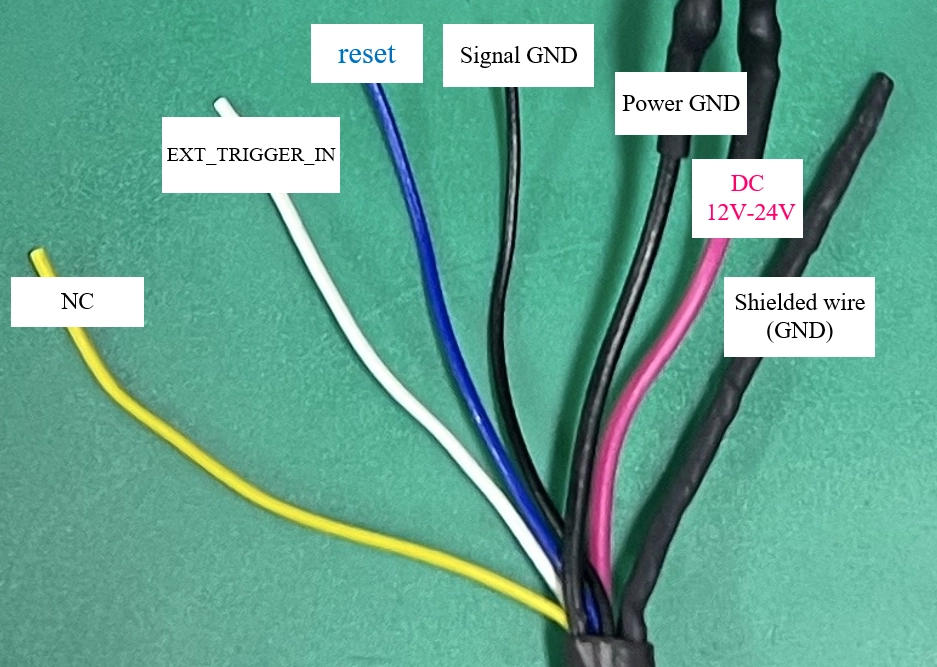
Power supply of camera
Power supply from DC adapter
Find the ToF(Time-of-Flight) camera’s power signal line (red is positive, black is negative) and provide the appropriate power supply. As shown in the picture below:
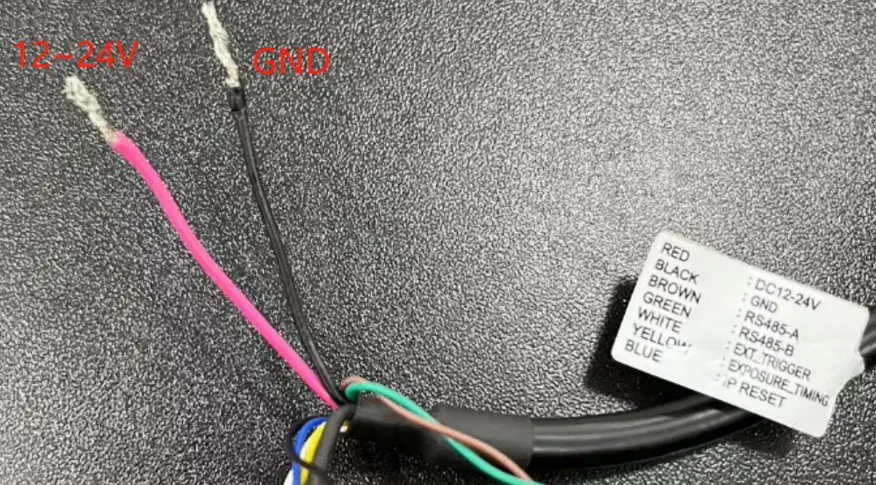
Power supply requirements: 12~24 V, peak current 3A, average current 1A.
PoE power supply mode
Some Vzense 3D cameras support PoE power supply, such as DS87, NYX660. PoE power supply can be used as below figure shows:
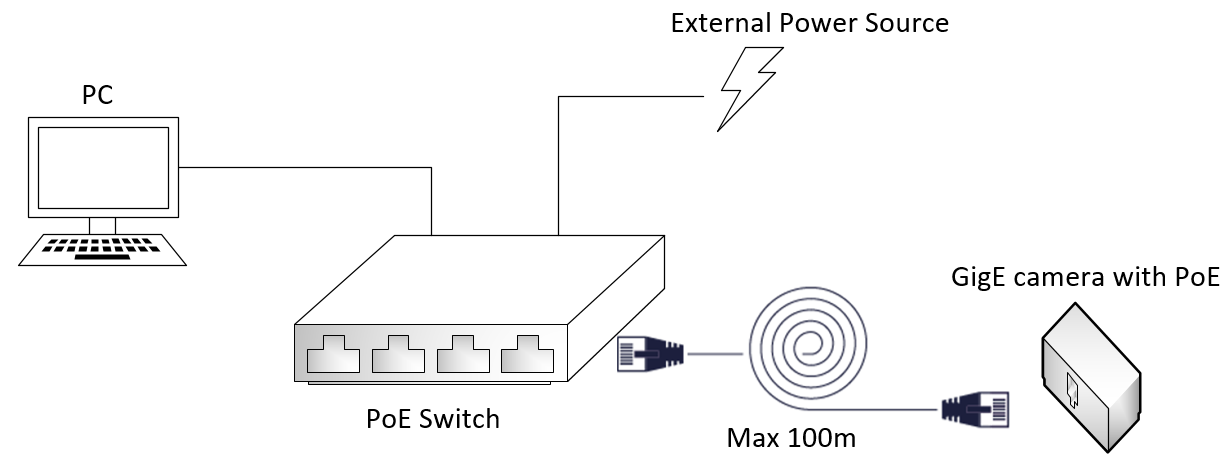
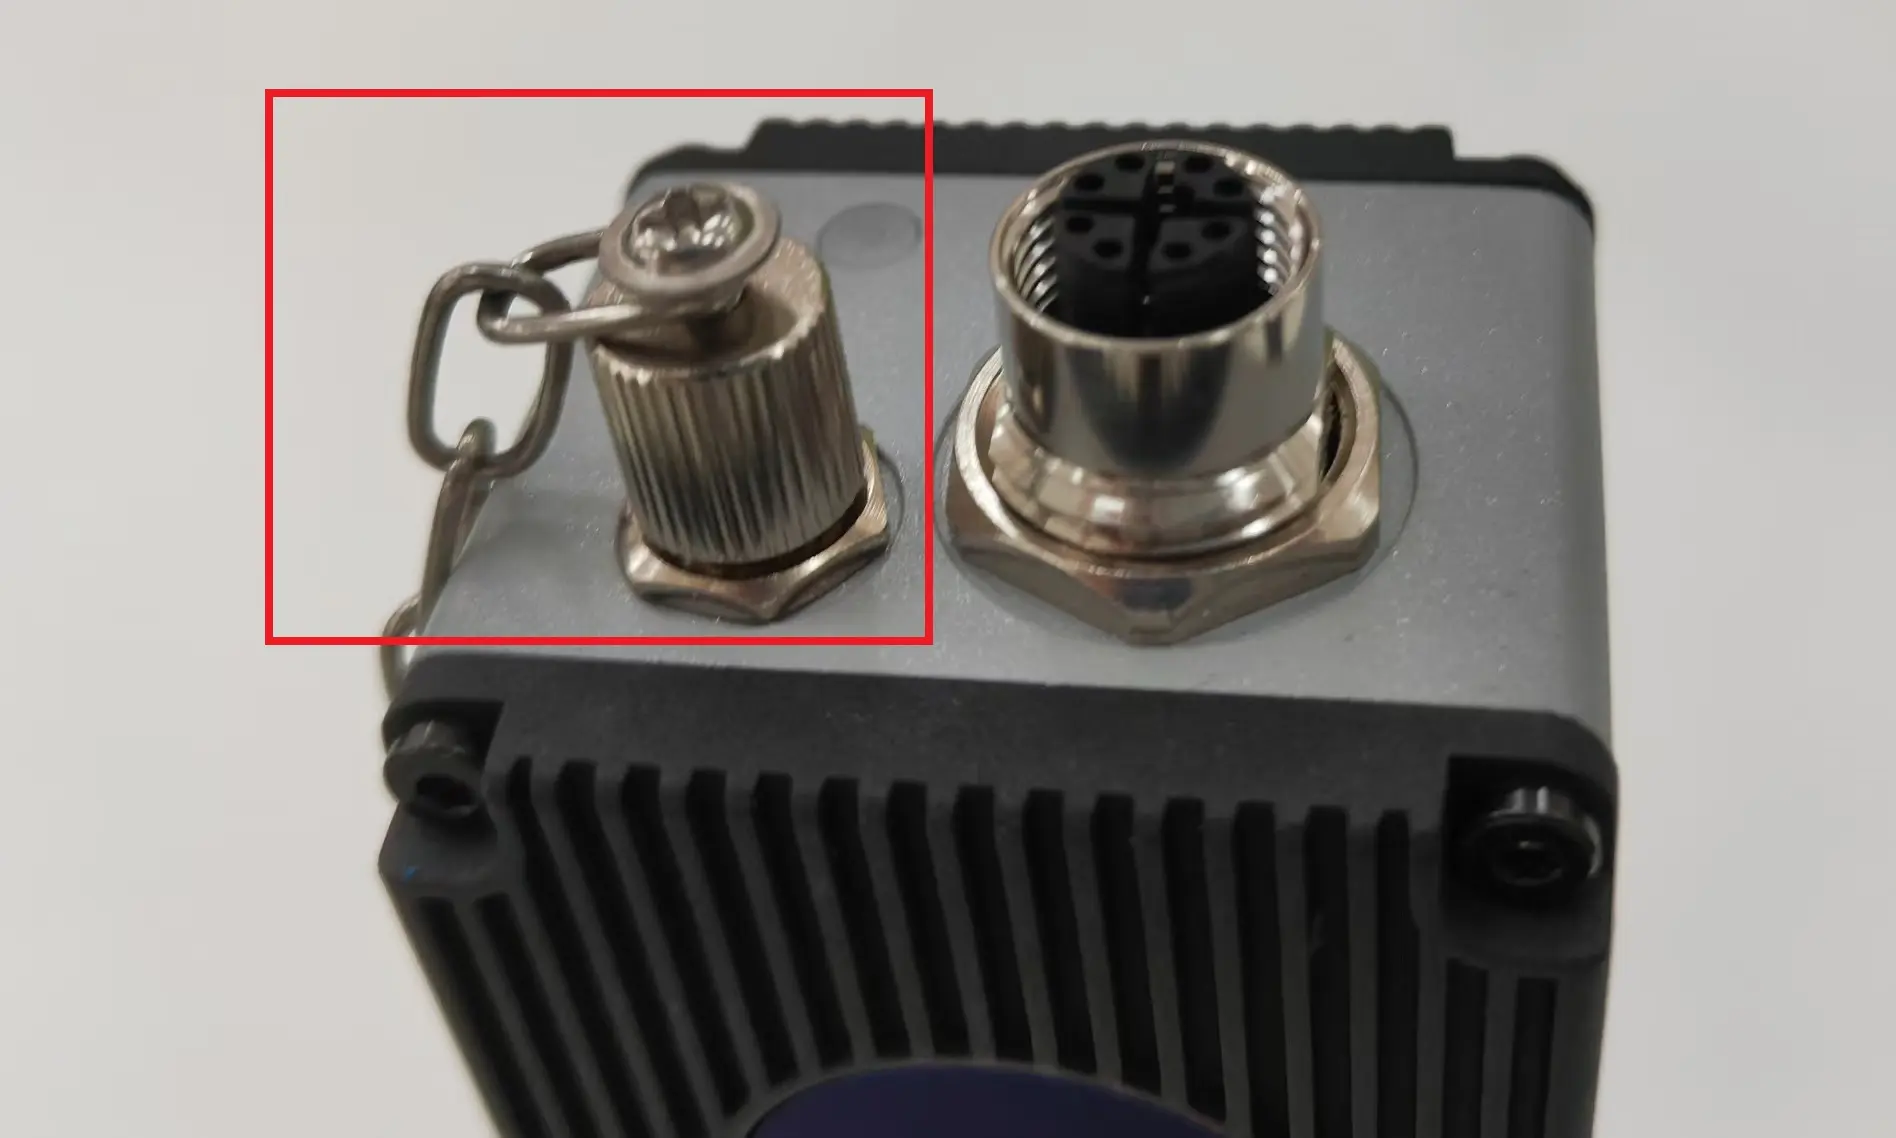
PSE or PoE power supply must meet PoE+ (802.3at) or above standards, below which the camera may not work properly. When using PoE power supply, it is necessary to install a waterproof plug with IP67 protection on the M8 A-type multifunction interface to ensure that the camera achieves IP67-level waterproof and dust proof performance. As shown in the following figure:
After successful connection of the ethernet cable and power supplying, the camera will be in ethernet broadcasting mode. The LED indicator on the side of the camera, which displays the power status, will be blue and flash repeatedly, while the RJ45 indicator for network connection will light up. As shown in the video below:
Network environment configuration
1. Network devices such as hosts and switches must support gigabit networks. The ethernet cable must meet the CAT5e or higher standards.
Note: It is recommended to use a wired network connection as much as possible, as unstable wireless networks may cause frame loss.
2. The IP address of both the camera and the host must be in the same network segment. The default IP address of the camera is 192.168.1.101. Therefore, if you do not change the camera IP address, you need to set the host IP address to 192.168.1.XXX, as shown in the following figure:
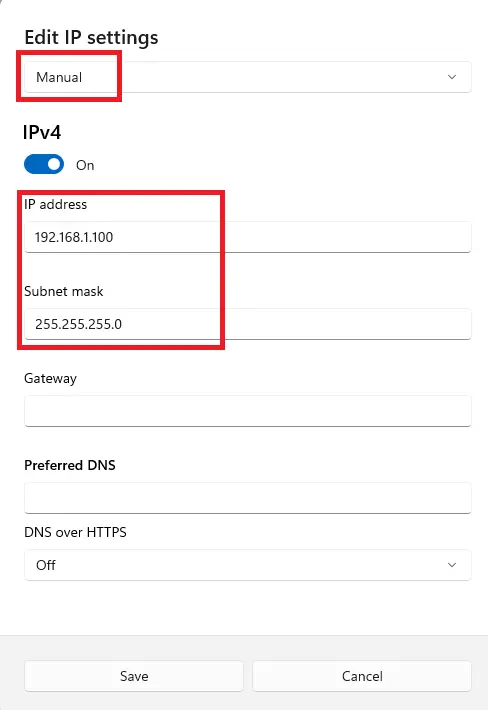
Note: Devices with the same IP address must be prohibited in the same network segment, which may cause conflicts.
3. Disable the firewall settings or allow ScepterGUITool to pass through the firewall. For example, when running ScepterGUITool on Windows, select the following configuration:
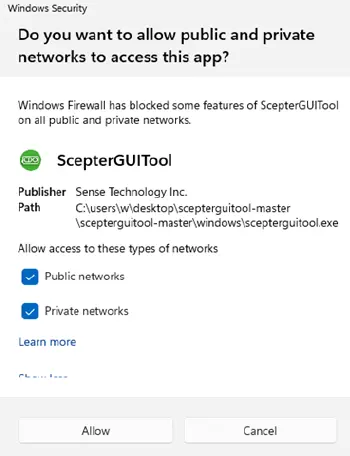
Run ScepterGUITool on host
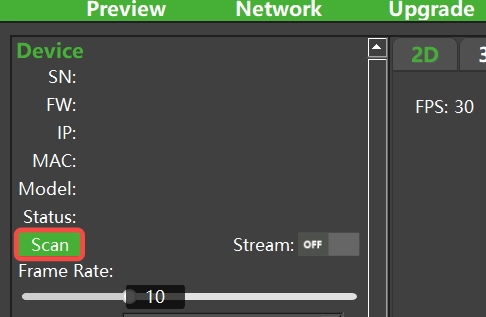
1. Download and install ScepterGUITool, and double-click to run ScepterGUITool. Click “Scan” and search for the camera, as shown in the following figure:
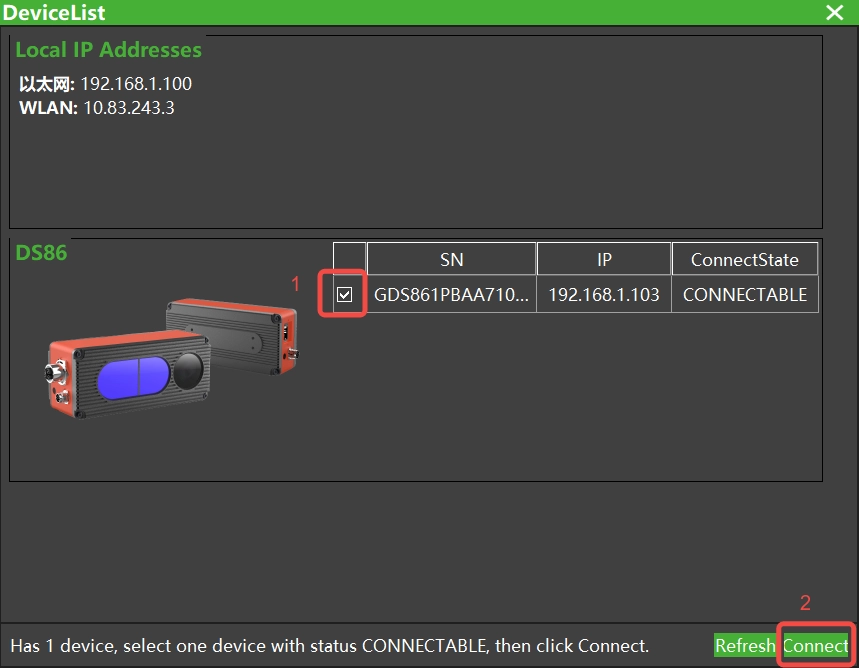
2. Select the camera you want to connect, and then click “Connect” to establish the connection, as shown in the following figure:
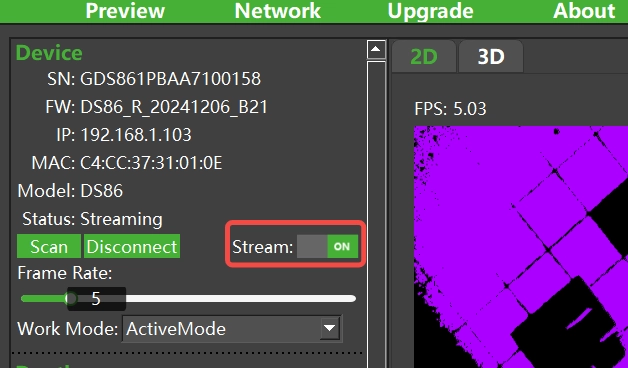
3. After the camera is successfully connected, click the icon next to “Stream” to turn it to the “ON” and then start the camera’s frame stream, as shown in the following figure:
4. Once the camera’s frame stream starts successfully, the image will appear normally on the right side, as shown in the following figure:
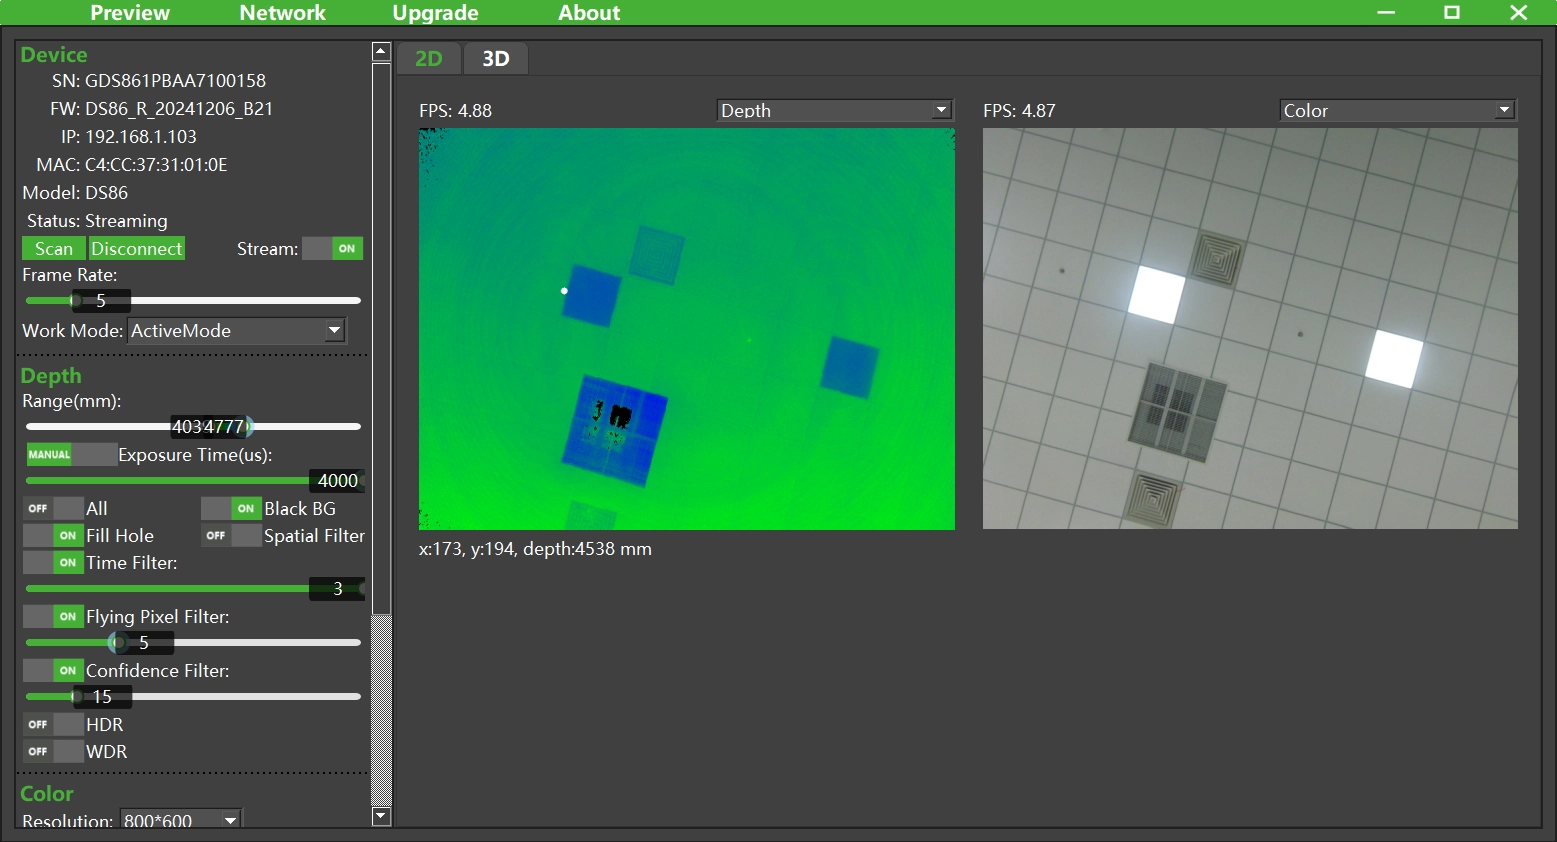
At this time, the camera is in the state of establishing an ethernet broadcast connection. The LED indicator on the side, used to display the camera’s status, will be blue and remain steadily lit, as shown in the video below:
How to view, modify and reset the camera’s IP address
Viewing camera IP address
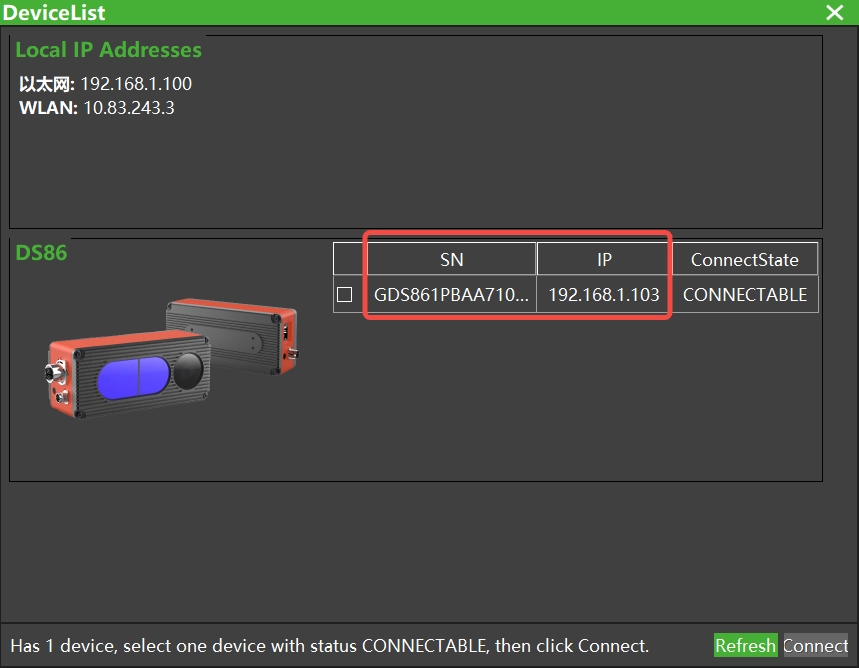
If you forget the camera’s IP address, you can check it by using the ScepterGUITool. After the camera is power supplied and ethernet connection is established, open the “ScepterGUITool.exe“, click the “Scan” button, and in the popup window, you will be able to see the camera’s SN code and IP address. As shown in the following figure:
Modifying the camera’s static IP
If you need to change the IP address of the camera, you can do so in two ways.
Method 1: Modify with ScepterGUITool
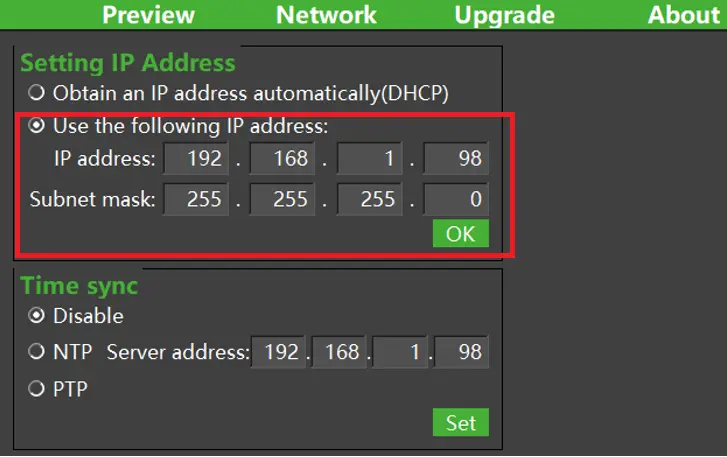
run ScepterGUITool and establish the ethernet connection between camera and host firstly, click the “Network” icon on the top window, select the fixed IP address mode, and manually configure the IP address for the camera. As shown in the picture below:
Method 2: Modify with software SDK
Sample code:
BaseSDK/Windows/Samples/Base/NYX650/DeviceIPAndSubnetMaskSet.
1. Camera’s static IP by API interface are:
//Set the IP address of the device in static mode
ScStatus scSetDeviceIPAddr(ScDeviceHandle device, const char* ipAddr, int32_t length)
//Get the IP address of the device in static mode
ScStatus scGetDeviceIPAddr(ScDeviceHandle device, char* ipAddr)
2. Camera’s static IP of the subnet mask by API interface are:
//Set the subnet mask of the device in static mode
ScStatus scSetDeviceSubnetMask(ScDeviceHandle device, const char* pMask, int32_t length)
//Get the subnet mask of the device in static mode.
ScStatus scGetDeviceSubnetMask(ScDeviceHandle device, char* pMask)
Setting the camera to DHCP mode
Dynamic Host Configuration Protocol (DHCP) is a network management protocol that automatically assigns and manages IP addresses for devices on a network from a central server.
In DHCP connection mode, you need to set up a DHCP server or a group of DHCP servers on the network. The DHCP server dynamically assigns parameters, such as IP addresses, to each device on the network, enabling them to communicate with other IP devices.
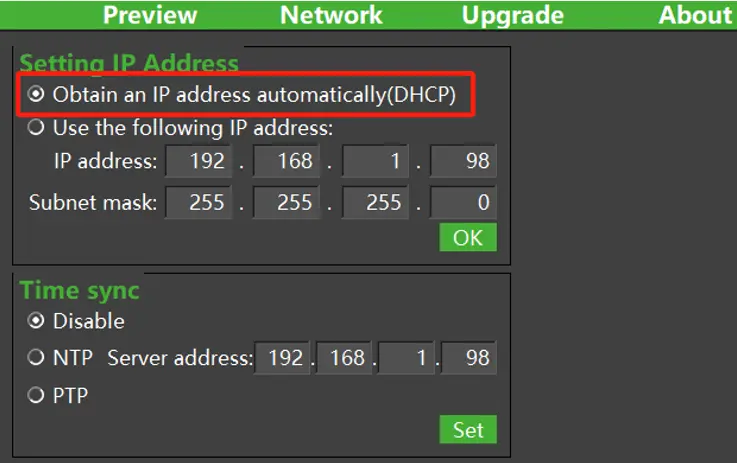
Use ScepterGUITool to open and connect to the camera. In the Network interface, set the camera’s IP address to “Obtain an IP address automatically (DHCP)“.
If you need to change the IP address of the camera to DHCP, you can do so in two ways.
Method 1: Modify with ScepterGUITool
As shown in the picture below:
Method 2: Modify with software SDK
1. Set the IP address obtaining mode to DHCP by the API interface
//Set enables or disables DHCP. Default disabled
ScStatus scSetDeviceDHCPEnabled(ScDeviceHandle device, bool bEnabled);
//Get the Boolean value of whether the device is in DHCP or not.
ScStatus scGetDeviceDHCPEnabled(ScDeviceHandle device, bool* bEnabled);
Resetting camera IP
If you can not open and view the camera IP address through ScepterGUITool, you can also reset the camera IP address with the RESET pin:
1. Look into the product specification and find the RESET pin. As shown in the picture below:
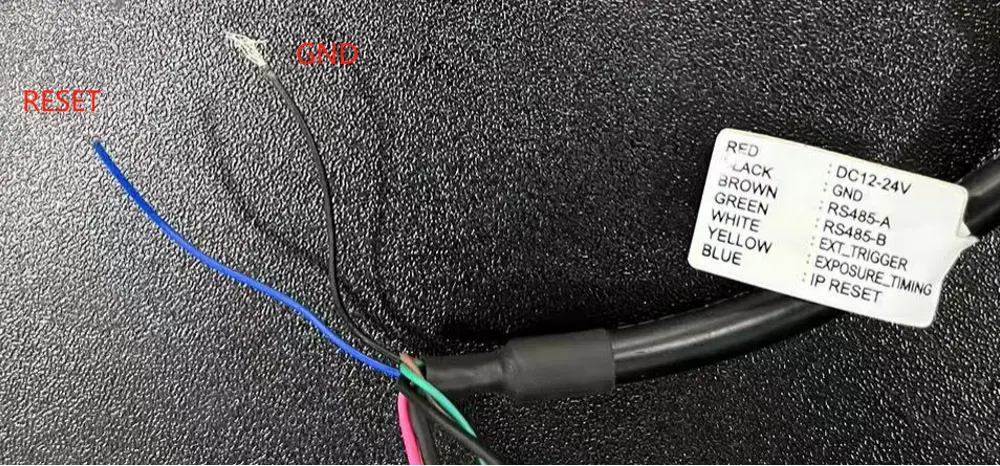
2. When the camera is powered on and the LED indicator is displayed normally, pull up the RESET pin for more than 10 seconds, then the camera IP address will be reset. The RESET signal should be between 3.3V and 24V.
3. After the camera receives a valid IP reset operation, the purple LED will light up for 5 seconds and blink twice, then the camera IP reset is successful, the default is 192.168.1.101. As shown in the video below:
Note: This action will not only reset the IP of the camera, but also the other default parameters of the camera.
Common problems and diagnose methods
Common camera connection problems
1. The power cable and network cable are improperly connected
After the camera is connected, if the power indicator or network indicator is not on, the power cable or network cable is improperly connected. Replace the power cable or network cable and try again.
2. The power adapter has insufficient power supply capability
If the camera cannot be connected or restarts continuously, you need to check whether the power supply capacity of the power adapter meets the requirements: 12V~24V, 3A.
3. Firewall setting
When blocked by a firewall, ScepterGUITool cannot search for the camera, but can ping the IP address of the camera. The camera is blocked by a firewall. You can view and change the firewall settings by following the steps below:
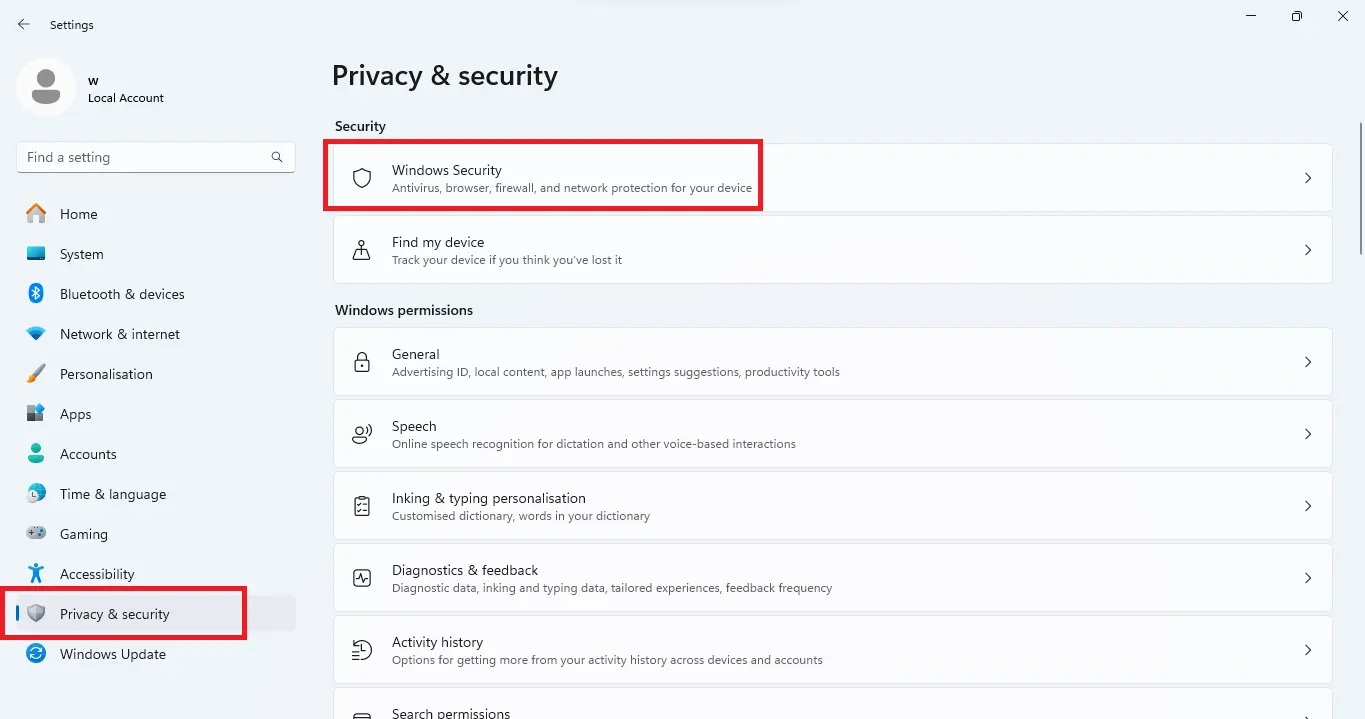
1) In the computer’s “Settings”, find “Privacy and Security” and open “Firewall and Network Protection”. As shown in the picture below:
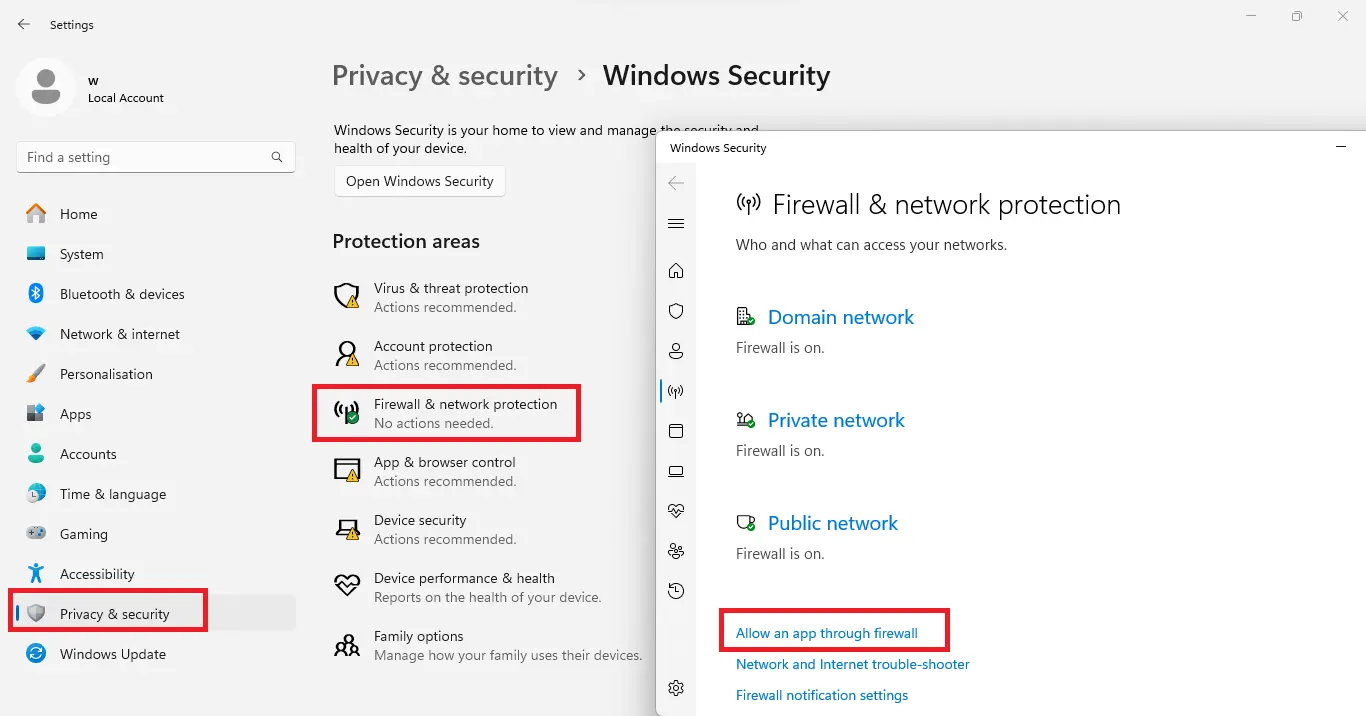
2) In “Firewall & network protection”, click “Allow an app through firewall”. As shown in the picture below:
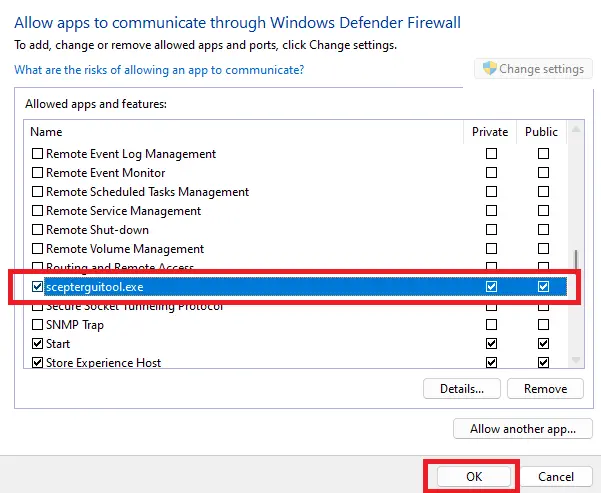
3) Click “Change settings”, find scepterguitool.exe, check the boxes as shown in the figure below, and click “OK”. As shown in the picture below:
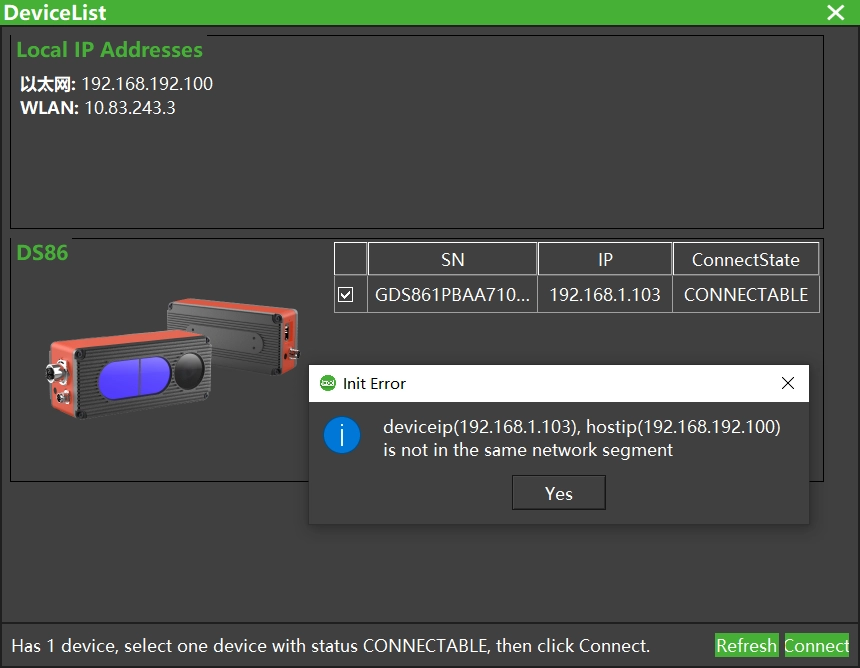
4) Camera and host’s IP address are not in the same network segment. When connecting the camera, if the IP addresses of the camera and the computer host are not in the same network segment, ScepterGUITool will display the pop-up shown below.
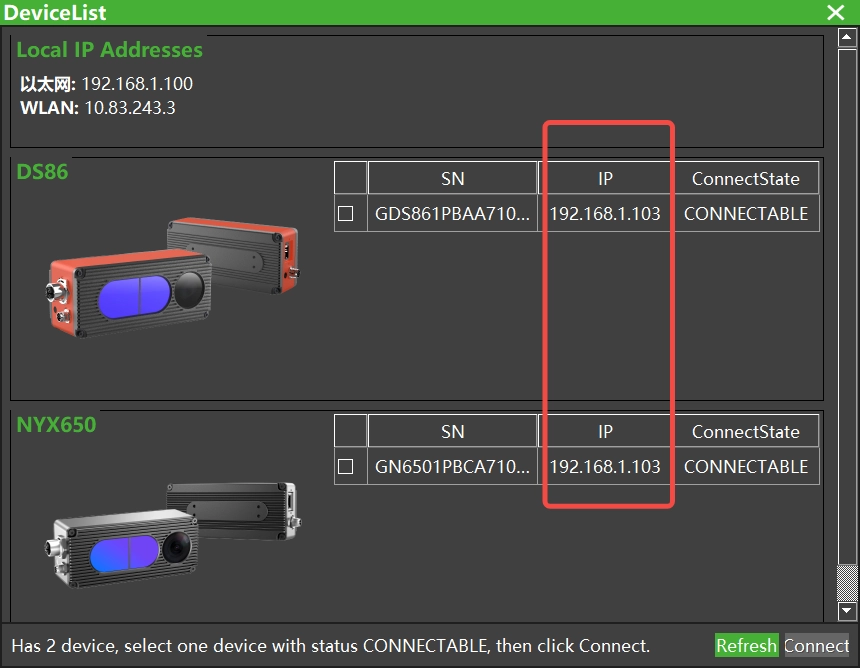
5) Duplicate IP Addresses for multiple cameras. When multiple cameras are operating within the same subnet, if there are duplicate IP addresses among the cameras, the cameras will not connect properly. When conducting a camera search, check the IP addresses of the cameras. If you encounter any duplicate IP addresses, connect to the cameras one by one separately and adjust their IP addresses as needed. As shown in the figure below:
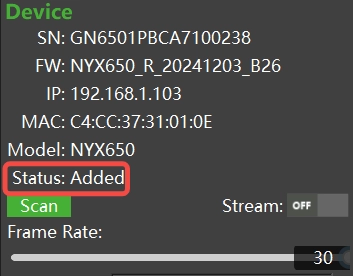
If you don’t modify the duplicate camera IP addresses and connect directly, the camera status will transition from “Opened” to “Removed” and then to “Added“, and the camera won’t connect properly. As shown in the figure below:
6) No DHCP server exists on the network. If the camera is configured in DHCP mode but the network environment(e.g. Router) doesn’t support DHCP, or if the computer host isn’t set to DHCP mode, the camera won’t be searchable.
Problem investigation and solution summary
If the camera fails to connect properly, refer to the following table to troubleshoot the issue.
| Issues | Possible Reasons | Solutions | |
|---|---|---|---|
| If the SecpterGUITool can detect the camera | 1. When connecting, it prompts that the IP is not in the same subnet 2. Unable to ping the camera IP | 1. Both the host and the camera have fixed IPs, but they are not in the same subnet 2. The network environment supports DHCP mode. One device (the camera or the host) is set to DHCP mode and the other is set to a fixed IP, but their IPs are not in the same subnet | According to the search results, you can view the camera IP and then set the computer IP to be in the same subnet as the camera |
| 1. Connect multiple cameras within the same subnet 2. Able to ping the camera IP 3. When connecting, the State is 'Added' | Address conflict caused by duplicate camera IP | Find cameras with duplicate IPs on the search results page, connect to the camera that needs its IP modified, and set a unique IP address for it | |
| If the ScepterGUITool fails to detect the camera | Power or network indicator is off | Power or network connection issues | Reconnect or replace the power supply or network cable |
| 1. Power and network indicators are normal 2. Able to ping the camera IP | The camera is blocked by the firewall | Turn off all firewalls. Check the firewall settings to see if the software is being blocked, adjust the settings to unblock it | |
| 1. Power and network indicators are normal 2. The camera is set to DHCP mode | The network environment does not support the DHCP mode or the host IP address is not in DHCP mode | Connect the camera and host to a network environment that supports DHCP and set both to DHCP mode, or configure both the host and the camera with fixed IPs in the same subnet |
|
If the following steps do not resolve the issue, use the ipconfig command to check your PC’s network status. Disable all networks except those on the same subnet as the camera, and then try searching for devices again. If the problems still exist, please contact our engineers for further assistance.


